Tool Bar
Tool Bar


The Tool bar has icons for most of the tasks of setting up a cue list and running a show. Patching, Fixtures, and Preferences are on the bar, but discussed under their own Help topics.
 The first group is the Files section. The icons trigger the activity for creating a New cue file, Loading an existing cue file, or Saving As (for backup) the current cue file. Individual Cues in the current file are saved via the Record icon as the show is developed, so there is no Save icon.
 The edit group has the triggers for Cut, Copy, Paste, and Save as.... Selecting a cue in the list will gather all the dimmer levels for that cue. Cut will remove the cue from the list, but keep the levels in memory. Selecting another cue in the list and clicking Paste will insert the the saved cue above the selection. Copy follows the same action, but keeps the current cue in place as well. Save as... will allow you to enter a cue call number and save the cue at that point. It is possible to overwrite existing cues that way, so a reminder prompt will appear in that case.
 This is Add, Change Channel, Insert After, Insert Before, and Delete. Before and After would be relative to the currently selected cue. Delete will simply remove the cue from the list. The add screen will appear for both Add and Insert:
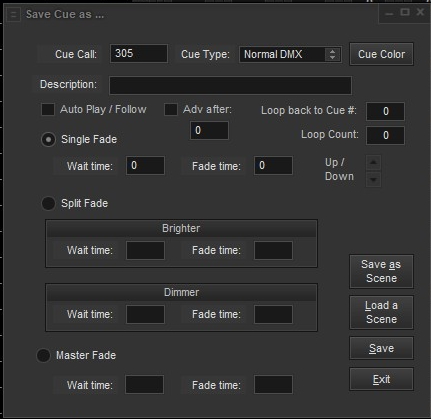
Here you can enter the cue call number, select the cue type, set the color for the Description text, and then the text itself.
The Cue Type dropdown shows 4 choices: a normal DMX cue for setting light levels or fixture settings, a cue that uses another cue file to run (nesting), a Followspot alert, using the included program 'playwin.exe', and an Open Sound Control (OSC) command to be sent.

A file cue could be something like a chase or lightning that you created as a seperate cue file. With an additional monitor connected to this computer, the Followspot alert will show the cue description on that monitor in the background color of the cue text here. The network connection is defaulted to port 5200 for host 127.0.0.1 (the local machine).
Selecting an OSC command will change the widow to this:
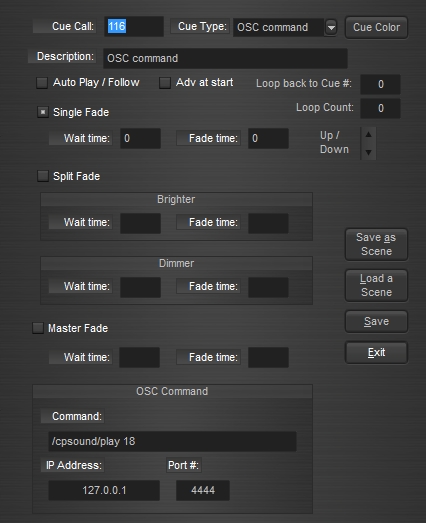
The parameters for the OSC command are the command itself, the IP address of the receiving device, and the port number that device is listening to.
Following that are the characteristics of the cue itself. If Auto Play is checked, the cue will execute when clicked or after the previous cue has completed. Advancing after a time allows for running several fades at once. The cue will start and if the next cue is set to Auto Play, then it too, will run after the entered delay. Although similar to entering a wait time in the Auto Play cue, if the same channel is changed in both cues, the rate of change will be different. Looping over several cues is allowed. The number of the starting cue and how many loops can be entered. The loop can be stopped immediately by the Stop button on the toolbar or the Pause/Break key. If the Space Bar is pressed, then the loop will finish a cycle before moving on.
The currently selected cue can be moved up or down in the cue list via the arrows.
Cues can be a Single fade, Split fade or Master fade. A Single fade starts after the Wait time and proceeds over the Fade time to move all the selected dimmers to their new values, brighter or dimmer. A Split fade will treat the dimmers going brighter and those going dimmer differently according to the values set in the Wait and Fade values. A Master fade will fade out all channels, including any settings of an active submaster. All transitions are stored by channel so multiple scene fades can be active at the same time.
The current channel values can be stored in their entirety as a scene for future use. This screen will open to allow additions and selection:
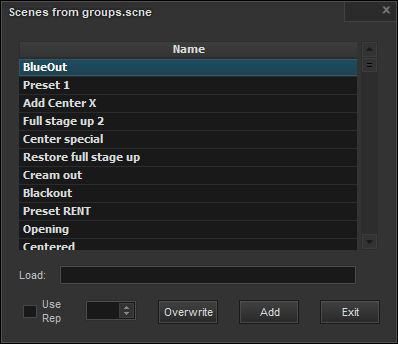
When you save a scene you may name it what you wish, Save, and it will appear as the next line item. When recalling a scene, click on one of the listed lines. To delete a scene, blank out the name. The leftmost button will change titles from Save to Delete. If you select a scene, buttons will appear to allow you to Overwrite the current channel levels with the ones from the scene, or to Add the scene levels to the current ones. A scene may be assigned to a bumpbutton. The far left dropdown is used to select the key to enable or blank to disable. Whether bump scenes are added to the existing levels or are the levels themselves is set in the "BumpOvrRpl=" entry of the CPLighting.ini file. 1 is add, 0 is alone. When working with a cue file set to use its own auxillary files, the Use Rep checkbox will switch the selection list to that of CuePlayer itself allowing use of a master scene list.
Change Channel will pop up this screen:
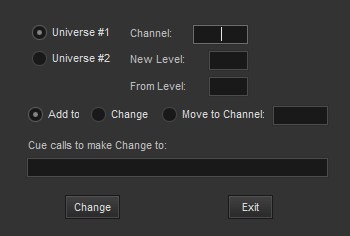
This allows you to change a channel setting to existing cues. If 'Add to' is checked, then the Channel number and Level entered will be added to the Cue calls in the list. The list can be individual call numbers or a range (e.g. 1,4,8-20). Useful when a light is added to or removed (level=0) from existing cues. Checking will change the level of the channels in the list from an existing level to another. For example, channel 10 could be changed to level 80 only where it is currently 50 in the list range. If 'Move to Channel' is checked then the level of the Channel will be transfered to the "move to" Channel. The original channel level will become 0. Useful if you're moving a light from one channel to another.
 The runtime group has buttons to turn Blind mode on or off, Autoadvance on or off, to Record the current cue levels (the Enter key will also record), and to Play a cue. The space bar will also Play the cue. To Play a cue immediately, without fades, right click the Play button. Pressing the space bar and the Ctrl key together will also play the cue immediately. Turning Blind and/or Autoadvance off is useful during cue setup and can be toggled with the F4 and F5 keys so you don't have to use the mouse.
 The first X will break out of a loop or stop a running cue. The Pause/Break key will also. The second X is the Blackout button. All dimmers will be set to their minimum value, which may or may not be zero. The ESC key will also do a blackout.
 These buttons are for the additional functions of setting up Softpatches, Submasters, Fixtures (LED lamps), Groups, Magic Sheet, Preferences, and Connecting to Cue Player Premium. These functions are explained under their own Help topic.