The Edit screen
The window that appears has boxes where the cue description or prompt can be typed and where the associated sound file is stored.
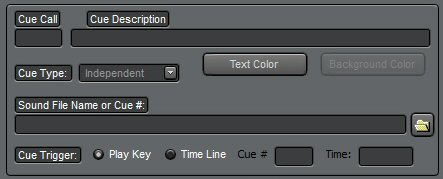
The Cue line entry is divided into two sections, the first of which does not clear when cues are added. The intention is that entry is the stage manager's call for the cue e.g. "SQ2". The second part is the cue description.
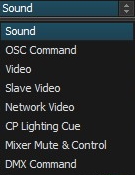 Cue Type is normally Sound. The older 'Normal', and 'Background' types have been discontinued. It can also be an OSC command, a local video, a remote or Slave computer video (allows control of two projectors), or one of four network connected computers running the video player. If Midi Output is selected, then the Sound File Name is actually a midi command, likewise for an OSC command. Commands can also be sent via the network to a computer running Cue Player Lighting. This allows running a show from one keyboard and operator. If using a Behringer X32 mixer, the active, unmuted, channels can be set via a cue. Enter the channel numbers separated by a comma or a dash for a range. e.g. "2,5,7-10,17". Channels 1 through 32 can be controlled. "None" will mute all those channels. Any of the OSC messages can sent as well. e.g. "/ch/01/mix/fader ,f .5" will set the first fader to halfway. Multiple messages can be joined by a ;. A DMX cue type has been added to allow sending DMX channels and values through either a USB or ArtNet interface. The syntax for that type is xx@yy;aa@bb, where xx and aa are channels (1 to 512) and yy and bb are levels (0 to 255).
Sound files may be typed in, drag and dropped from a file manager, or selected via the button.
If the sound file entry is just a number, then the cue is considered a volume or action cue for that number cue. A value of 0 indicates a Delay cue for the duration in the Fade/Cross Time box. A Delay cue doesn't play anything, just pauses the automatic advance for the specified time.
You may select a color for the text and the background (unless it is already black) of each cue.
The trigger for playing or running the cue can be either the Play key, as selected from the Options menu, the time position of an already running cue, or a time of day. The number of a playing cue goes into the Cue # field and the time position, in tenths of a second, goes into Time field. If the Cue # is 0 and the Time is entered as hh:mm, the cue will play at that time. Hours greater than 12 are afternoon and evening, under 12 for morning. For the cue you are editing to be triggered this way in use, it must be the current selected cue in the cue list.
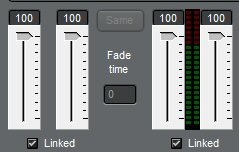 The initial volume level can be set, as well as defining a cross-fade to another volume level to happen automatically when the cue starts to play. You can fade-in or out as you wish. The duration of the transition is the value in the Fade/Cross Time box in tenths of seconds. The Same button will set the equalizer and reverb to the same settings as the previous cue. If the cue type is Video, then the third slider will be colored purple and sets the brightness of the output after the Fade in time. Between the sliders is a vu meter showing the volume levels when using the Test button to play the sound file.
 To avoid having to edit a sound file to shorten it, or to set the exact start and stop times of a loop, that timing can be set here. The time can be typed in or when the button clicked, this screen appears:

The left mouse button or the cyan arrows will move the start time, The right mouse button or the yellow arrows will move the end time. The Test button will play the file. If Loop is checked it will continue to play while the times are adjusted. While playing, the Mark button will copy the current playing location to the clipboard. You may then paste that time easily into a Time Line cue 'Time:' position. If 'Vamp' is checked, the cue will play from 0 to the end time and then loop back to the start time. It will continue that loop until a cue with the Action 'End Vamp' is played, at which time the loop end will deactivate and the file will play to the end.
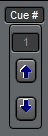 The up and down arrows are used to move the cue being edited up or down in the cue list. A number can be entered directly and the current cue will move to that line. Be careful rearranging a cue list with action cues as, for example, a Fade cue for cue #3 will not work if #3 becomes #2. The program is designed to keep track of movements, but they should be checked.
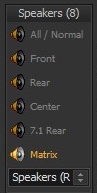
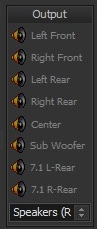 The Speakers box allows selection of which speakers will play the output as well as the sound card used to do it. The program will inspect and discover all available outputs and put them in the dropdown box. The caption will indicate how many speakers the selected sound device has available. Stereo input files can be sent to any pair of speakers. Front and Rear can be selected together for a quadraphonic output. The Stereo/Mono switch changes the possible selections as shown. If the sound source file has more than one track (e.g. 5.1 has 3), the Matrix selection will show this selection screen:
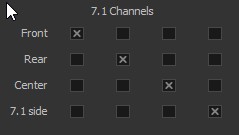 Here input channels can be sent to outputs as a matrix. As illustrated here, the input channels are matched to their expected outputs. But clicking X's anywhere in the grid will send channels to outputs as you wish.
 Click the Loop box to continuously repeat a sound until some action is taken against it. If the sound file is a playlist, the list will be looped. If the cue is an Action cue the program will jump back to the cue number entered. A loop can be stopped by an Action cue, particularly a Wait for End, whereby the program will finish the loop and move on. Auto Play will start the cue playing as soon as the cue line is active, most likely from a Cue Advance. Auto Fade will start to fade the cue at the Fade at End value before it would normally end. For example: if the cue is 13 seconds and the Fade at End value is 30, the cue will start to fade at 10 seconds into the cue. All Fade durations are in tenths of a second. For example, a value of 20 gives a 2 second fade. The XFade checkbox can be used for both sound and video cues. For video, it indicates the cue will cross fade from whatever is currently playing in the video to the file for this cue. For sound, since multiple files could be playing, the number in the Cue # field indicates which cue should be faded out as this one fades in. The fade out time of that cue will be the same as the Fade time of the cue being edited.
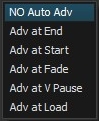 Cue Advance will drop down to allow selection of No, at the End, at the Start, when a Fade is started, or (if a video cue) when video is paused, or when a file is loaded or rendered. It takes a small amount of time to load and render a video file, so if the Master and Slave videos are to play in sync, then they must be loaded first and then played with a separate cue(s). All of these Advances are available so that the cue list can be designed to run simply going cue to cue.
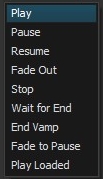 Cue Action is selectable for numbered sound file entries. If the sound file name is an actual sound file, then Play is the only option and the drop-down is disabled. Otherwise, you may select Pause, Resume, Fade Out, Stop, Wait for End, End Vamp, or Fade to Pause to affect the numbered cue. Wait for End works for Independent cues only. End Vamp, also Independent only, lets a vamping cue continue to the end of its file. Fade to Pause fades out the sound as in Fade Out, but rather than ending the play, pauses the file so that it can be started again at the same place with a Resume cue. Play Loaded will simultaneaously play all preloaded cues, sound or video. This allows two or more sound cues that have different sound devices to be played with their outputs synchronised. Playing a video to both local video players would also be in sync.
Picking an F key  will set the cue to allow playing that cue whenever that F key is pressed. You may also use the 'k' and 'l' keys that some key mapper programs employ.
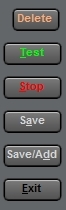 The Delete button at top will delete the cue, the same as on the Main screen. It is repeated as it is difficult to delete an auto-play cue from Main.There are also buttons to test, stop and save the cue. Save/Add allows adding a cue immediately after entering the previous. If a cue has corresponding action cues, an alert will pop up suggesting to check them so that they stay in sync. Since there is error checking at Exit, the top-right X to close the window is disabled.
There is a 5 band equalizer and a reverb to customize the output sound without having to go back to your sound editor program to 'tweak' it.
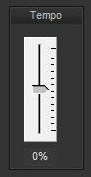 For Sound cues, there is the option to set the tempo of playback. The speed of the file can be adjusted plus or minus 25% without changing the pitch. Useful in dance performances to match the choreography.
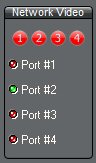 If the Cue type selected is 'Network Video' then this menu will appear instead of the Tempo setting. It will indicate which of the four remote video players are connected by turning the dots green and allow selection of which of them this cue applies to. Multiple ports can be selected so that a video command could go out to any or all ports. That way one cue can fade everything, for example.
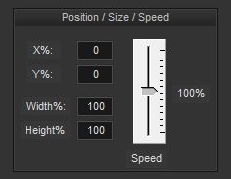 Video cues will get this window allowing postioning of the image at a point on the display window. For example, X%=50 and Y%=50 will put the upper left corner of the image in the middle of the display window. The size may be adjusted as a percent of the original. Like Tempo for sound, Speed will will adjust the playback speed plus or minus 100%. Expect some jerkiness in playback once you get down below 10%.