Options Menu
Set Defaults:
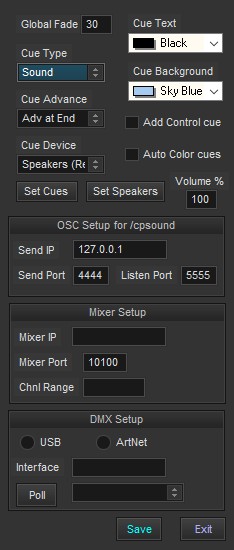 Global Fade ets the fade duration for the "Fade All" button. In computers with more than one sound card, Cue Device allows selection of which device will be the default for added cues. The output device is still selectable by individual cue. If the Cue Device is changed, the Set Cues button will update all the cues in the current list. The default speakers for added cues can be set to that of the first cue in the list. Also there are settings for the default cue type, initial volume, and display colors. These are also still selectable by individual cue. Checking the Add Control cue will add an additional control/action cue for each added cue. Auto Color cues will change the cue font color to gold for delay and lime for auto-play cues as they are added or edited. The volume level of new cues may be set for less than 100% to allow headroom The parameters for OSC (Open Sound Control) are the IP address and port number of the receiving device, and the port number Cue Player will use to listen for commands. If you have a Behringer X32 mixer, its IP address and port number will need to be set before 'Mixer Mute & Control' cues will work. The contiguous channel range for the muted channels can be set. Details are in the OSC Control topic. An additional option for external control is using DMX. Either a USB, using D2xx, or an ArtNet compatible interface device may be used. They are the same as would be used for lighting control. Both DMX King and Enttec Pro make excellent units.
Run Mode - 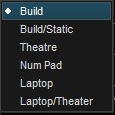 There are 6 modes. The Build mode shows all the cue line numbers and the Cue List box. Build/Static disables the auto-advance and auto-play to make it easier to enter a large batch of cues. When Theatre is selected it removes the cue line numbers and Cue List box from the screen. It also disables right-clicking the cue list to edit. NumPad mode sets the Num Lock on the keyboard and expects a line number to be entered from the Number Pad. The number pad Enter key will play the line and the - (minus) key will fade it. This makes Cue Player great for sporting events where different 'Jock Jams' are used as sound files. The two laptop modes expand the button sizes to make it easier to use on touch screen computers.
Set Skin - Allows selection of a skin or graphic appearance of Cue Player. Snow Leopard mimics Apple software.
Change Clock Color - Allows selection of the color of the real time clock display. It also affects the running time display of a playing cue.
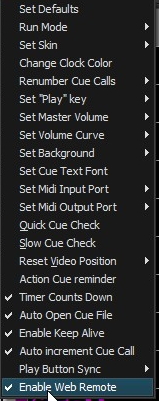
Renumber Cue Calls - 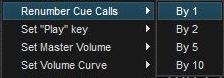 Adds the Cue call either Sxx or Vxx to sound and video cues.
Set "Play" Key - Allows selection of keyboard activation of a cue by either the Enter key or the Space bar.
Set Master Volume - Master volume setting at startup can be either what it was when the program was last closed or what it was when the last cue was edited.
Set Volume Curve - 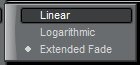 Fades in and out will follow either a linear or logarithmic curve. When using the linear curve, the volume range is from 0% (silent) to 100% (full). When using the logarithmic curve, the volume range is from -100 dB (effectively silent) to 0 dB (full). For example, a volume level of 50 is 50% linear or -50 dB logarithmic. Extended Fade is a linear fade, but for fades greater than 2 seconds, the fade is done a second shorter down to 10% of the original volume and then the final fade takes 1.5 seconds. This gives a more gentle fade out.
Set Background - The Main screen background color can be either Light, Dark, or Black. Light allows maximum use of cue line background and text colors. Black is traditional to avoid distracting light during a show.
Set Cue Text Font - Allows selection of the cue list text font and font size.
Set MIDI Input Port - Sets the MIDI port for remote control of Cue Player. Available ports are automatically discovered at program start and then listed. The MIDI Channel number is defaulted to 0, but can be changed by editing the cueplayer.ini file entry for MidiChannel. A sub-menu will appear for selection of possible MIDI devices.
Set MIDI Output Port - Sets the MIDI port for Cue Player to send output control signals. A sub-menu will appear for selection of possible MIDI devices.
Quick Cue Check - The current cue list will be checked one by one to see if the sound files exist where they need to be.
Slow Cue Check - The current cue list will be checked one by one and 3 seconds of each will be played.
Reset Video position - Restores the video player to the same screen as the main Cue Player. Allows control of the player to be regained should it go offscreen to a inactive monitor.
Action Cue reminder - When selected, changes to a cue that has an action cue associated with it will trigger a reminder window to check the cue number in that action cue.
Timer Counts Down - When selected, the timer display of a playing cue counts down from the length of the sound file toward 0. Otherwise, the time display counts up from 0.
Auto Open Cue File - When selected, automatically opens the previous cue file at program start. Otherwise, the cue list is blank at start.
Enable Keep Alive - When selected, activates the disk drive every minute so that it stays spinning. Still, it is recommended that power control be turned off. That is, set the computer to be constantly on. It would also be a good idea to turn off any virus checking program.You do not want a virus scan starting half way through Act 1.
Auto increment Cue Call - When selected, automatically increments the number entered into the Cue Call field.
Play Button Sync - When running a second computer as a emergency backup during a show, the Play cue commands of the first computer can be sent via OSC to the second. The latency is minimal. Details are in the OSC Control topic. You may also use a TCP connection. The IP address of the Master computer will be asked for when this is selected. Using TCP for the hot swap will free up the OSC ports for other use.
Enable Web Remote - When checked, the remote control server will be launched and minimize itself in the lower left corner of the screen. Unchecking will remove it. Details on how to use the remote control are in the "Remote Control" topic.