Softpatch
Softpatch


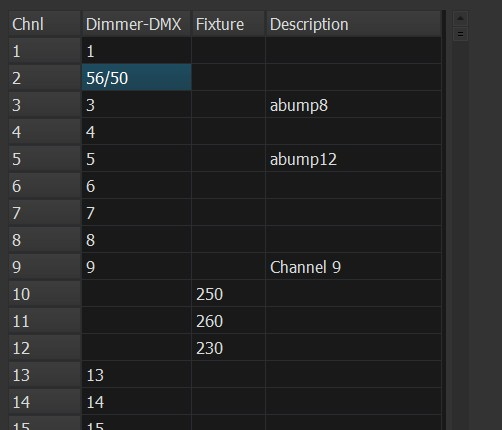
This shows the top and bottom of the softpatch screen. The actual height will depend on the height of the main screen. Softpatching is a powerful way to customize how you control your lights. If you are not familiar with it, simply, it is the way to have one or more dimmers controlled by a single channel on the main screen. If there are several lights aimed at a particular portion of the stage at various angles, this allows you to set the light level with one channel. The ability to do this is enhanced by the feature of proportional dimming. If you look at Channel 2 in the picture, you will see that dimmer 56 is being set. It has the extra notation of /50 meaning that it will, at most, go to 50% of total brightness. Taking channel 2 from 0 to 100 will therefore have the effect of changing dimmer 56 from 0 to 50.
Fixture mapping makes it easier to work with LED fixtures. It allows one channel to control the colors and intensity of a fixture. In this example, there are LEDs with their address settings at 230, 250, and 260. That is, 230 is the dip switch setting, Red may be at 230, Green at 231, Blue at 232, and Intensity at 233. All that is specified in the fixture's profile. With fixture patching, entering "100R80" into the channel field of channel 12 will set all of those 230-233 channels to the right value. A right click of the channel field bill bring up the fixture's color picker so any other color can be selected and mapped to the correct 230-23x channels. Rather than the complete "100R80", just an intensity value or just a gel number from either the gel wheel or the user wheel can be entered. This also allows for easy grouping of multiple fixtures. For example, if there are 4 identical fixtures covering an area of the stage, they can be set closely together up in the 400's, but fixture mapped so that channels 10-14 control them, it makes it easier to write cues. They could even be set as a Group so that "g4" selects all of them.
The Description column has the text that will appear as a hint when the mouse is hovered over a channel box on the main screen. If the word "nbump5" is in the description, then that channel will bump to 100% when the F5 key is pressed. "nbump6" works with F6, "nbump7" with F7, and so forth up to 12. If the word is changed to "fbump5", then rather than a zero count fade when the key is released, a timed fade will happen. The time is determined by the "BumpFade=" entry in CPLighting.ini. A value of 10 is one second, 5 is 500 msec., for example. Timed bumps for F5 would be done with "tbump5(x.x)", where x.x is the duration in seconds. For example, "tbump7(4.3)" would bump the channels where that was in the description for 4.3 seconds when F7 was pressed, even when released sooner. Entering "abump5" acts as a toggle switch for that channel and key. Any toggled keys will display on the top line above the clock.
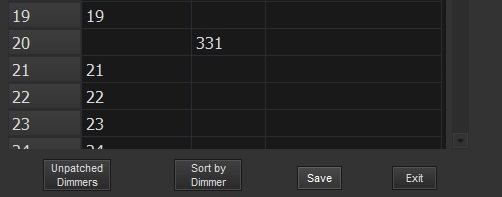
At the bottom of the screen, the Unpatched Dimmers button will show a window with a list of all the available or unassigned dimmers. Sorting the rows can be by Channel or by Dimmer. Save will record any changes and Exit will close the screen without saving.