Video Player

The best way to use video is to have two video cards in your show computer and set up Windows for a dual monitor display.On a laptop, there is often an auxiliary port or you could invest in a USB to video adapter. You would set that up to have the Cue Player control display on either the left or right and slide the video player over to the other. The little button with the monitor icon will put you in full screen mode. Even more, if you right click it while it is still on the same screen as Cue Player (like at startup), it will move the player over and make it full screen in one click. Which way it goes depends on which half, left or right, the window is when you click. The 'Resize to Last' option will modify this behavior to moving the screen to the size and position it last was when closed. You can also double click on the screen part to go full screen or not. A right click on the screen will bring up a menu about hiding controls and such. When the controls are hidden, the screen position and size can be fine-tuned using the arrow keys. Ctrl+Arrow will move the screen up/down/left/right per which arrow. Alt-Arrow will resize the screen - down or right for larger, up or left for smaller.
Video cues have some additional information in them from sound cues. At the end of each cue is a series of two or more numbers e.g. C;\video.mpg;0,150, or C:\video.avi;0,132,400. The numbers indicate where the movie is to start and where it is to pause or stop. In the first example, the movie would start at 0 and stop at 150. In the second, the movie would start at 0, pause at 132 and if resumed, go on to 400 before stopping.
Please note - unlike sound cues which can be buffered such that cue #3 with one sound can be immediately followed by cue #4 with another and #4 can be selected waiting to be played, back-to-back video cues need a fade or stop action cue between them. However, pictures and video can be cross-faded one after another. A series of cross-fades must start with a normal cue. Cross fading is allowed between picture to picture, picture to video, and video to video.
The sound from video cues does not go through the same audio process as a regular sound cue. As a result, the equalizer, reverb, and speaker settings of the cue are not in effect. Since almost all theatrical videos are silent, this is not considered an issue. Should those features be needed, it is suggested to extract the sound from the video and play it as an additional autostart cue after the video.
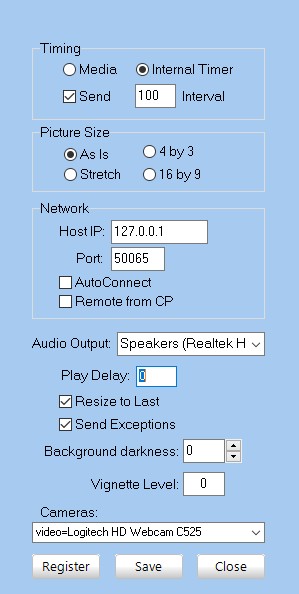
Playwin Settings:
Clicking the tool icon on the far right of the command bar will bring up a window to allow you to set:
Timing - select either using timing information from the playing media itself of an internal timer. The interval of the internal timer is set in milliseconds. Experience has shown that more repeatable timings come from the internal timer.
As Is - when displaying images (.bmp, .jpg,, .tif, .png, etc.) the displayed image is rendered at whatever size it is, independent of the video player window size. Depending on the relative sizes, only part of the image may appear.
Stretch - the displayed image is stretched to the size of the player corner to corner.
4 by 3 - the aspect ratio of the image is held to 4 by 3, which is the old TV ratio.
16 by 9 - the aspect ratio is held to 16 by 9, or 'widescreen'.
Network - The IP address of the computer running Cue Player must be entered so Playwin can find it. If running on the same computer as Cue Player itself, it can be left blank or 127.0.0.1 should connect no matter what the actual address is. Port number default is 50065. If Remote from CP will change the communications accordingly. If you do not want to click the connect icon every time, select AutoConnect. If the video player is running on a remote computer not running Cue Player, then Remote from CP should be checked to enable entering the host computer IP address. You can edit the cueplayer.ini file values for NetPort to change it if needed.
Audio Output - The audio output device may be selected with the same options as the main cue edit screen. It applies to all video cues.
Play Delay - there was an issue (since been corrected) with a brief flash of a prior paused video cue upon display of the next. The fade in of a cue was delayed by the amount of this setting to avoid that. It can still be used to 'tweak' sychronization of two computers.
Resize to Last - when the screen icon toolbar button is right clicked, the screen will resize and position to what and where it was when shut down. A left toolbar click ignores this setting and the screen will expand to fullscreen.
Send Exceptions - any problems with rendering or display will be sent to the computer running Cue Player.
Background Darkness - a level between 10 and -10 of the background 'black' level. -10 is blackest. You may want to set this to match the black level of your projector to make image edges blend in.
Vignette Level - the edges of a playing video can be softened to make it blend better with the projection surface.
Cameras - drop-down selection of any installed cameras for display as cue file name 'Live'.
Right Click menu:
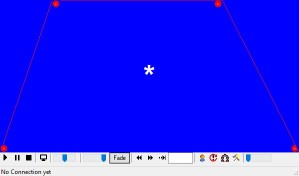
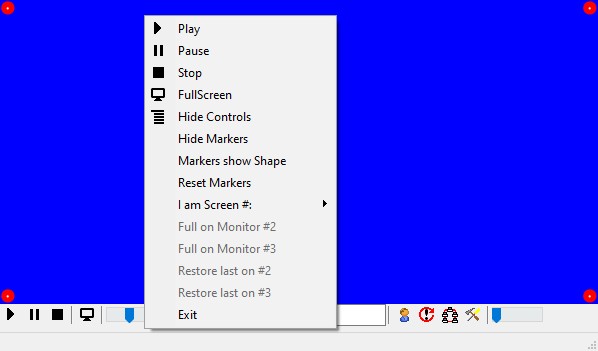 Right clicking in the blue background of the player will bring up a menu of the running controls and appearance options. Full Screen and Hide Controls are toggles for those two options. Corner pinning is done by moving the red corner dots to a position on the blue background. Use them to correct the image for keystoning or an angled projection surface. Clicking 'Markers show Shape' will toggle the screen to show 8 green dots and the prompt to 'Markers show Perspective'. Hiding the markers will save the postions. The green dots can be moved to create a shape to contain the video. They could be used to mask out a doorway, for example. When more than one monitor is setup in Windows, the option to quickly move and make fullscreen to either additional monitor is enabled. If the player has been sized already to a projection surface and closed, that size and position can be restored with a click.
Here are examples. The blue is the setup screen and the test pattern shows the resulting image.


Remote Networked Video -
First step would be to copy playwin.exe, playwin.ini, gdot.png, and dot.png from your main Cue Player One install to a directory on the networked computer. Also copy the LibAV64 directory and its contents to the same directory. Second, the video files must be the same, and in the same place on both computers. That is, if sunset.jpg is in the C:/shows/thisshow/pictures directory on your main computer, sunset.jpg wants to be in the c:/shows/thisshow/pictures directory of the remote computer.
Look at the Help > About screen on Cue Player One and note the IP address of your main computer. Go to the remote computer and start playwin.exe. Click on the Settings icon (hammer and screwdriver) and look in the Network panel. Enter the IP address of the main computer and the port number 50065 (default). Check both boxes AutoConnect and Remote from CP. Position the video window as you would if running at the main computer. Right click to bring up the options window and select the number screen for this player.
Come back to your main computer and the show cue list. Add a video cue and choose a screen number for it. The number wants to be something greater than what you entered for "# of local videos" on the Preferences screen. It will be effective at the next restart.
-----
Just a general note – playing videos is not easy for computers. While the sound playback will work well with a entry level laptop, using it to also play a movie may result in stuttering and hangups. For serious video playback, a desktop computer with a plug-in video card is recommended.