Tool Bar
Tool Bar


The Tool bar has icons for most of the tasks of setting up a cue list and running a show. Patching, Fixtures, Messaging, and Preferences are on the bar, but discussed under their own Help topics.
 The first group is the Files section. The icons trigger the activity for creating a New cue file, Loading an existing cue file, or Saving As (for backup) the current cue file. Individual Cues in the current file are saved via the Record icon or enter key, as the show is developed, so there is no Save icon.
 The edit group has the triggers for Cut, Copy, Paste, and Save as.... Selecting a cue in the list will gather all the parameters for that cue. Cut will remove the cue from the list, but keep the parameters in memory. Selecting another cue in the list and clicking Paste will insert the the saved cue above the selection. Copy follows the same action, but keeps the current cue in place as well. Save as... will allow you to enter a cue number and save the cue at that point. It is possible to overwrite existing cues that way, so a reminder prompt will appear in that case.
 This is Add, Insert After, Insert Before, and Delete. Before and After would be relative to the currently selected cue. Delete will simply remove the cue from the list. The add screen will appear for both Add and Inserts:
 A tabbed window will open showing the 4 different types of cue. The Add screen is customized for each type and explained under the topic Cue Types.
 The runtime group has buttons to turn Blind mode on or off, Autoadvance on or off, to Record the current cue levels (the Enter key will also record), and to Play a cue. The space bar will also Play the cue. To Play a cue immediately, without fades, right click the Play button. Pressing the space bar and the Ctrl key together will also play the cue immediately. Turning Blind and/or Autoadvance off is useful during cue setup and can be toggled with the F4 and F5 keys so you don't have to use the mouse.
 The first X will break out of a loop or stop a running cue. The Pause/Break key will also. The second X is the Blackout button. All dimmers will be set to their minimum value, which may or may not be zero. The ESC key will also do a blackout.
 These buttons are for the additional lighting functions of setting up Global cue changes, Softpatches, Submasters, Groups, and Fixtures (LED lamps). Other than Global, these functions are explained under their own Help topic.
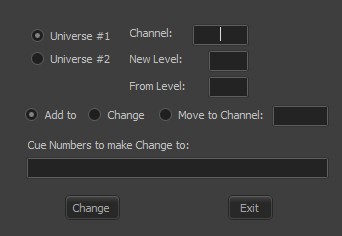 Global or Channel changes allows you to change channel levels across the entire cue file or selected cues. This lets you, for example, add in a level for the piano light you forgot about, or move a light to another channel when a dimmer conks out.
 The final group is for setting up network based prompts and overall preferences.
 Network or Web prompts are one of the Control cue options. They are intended for followspot and backstage prompts. As a cue, the message is in the cue description and sent when the cue is played. This screen allows for an immediate message. The 'L' type is not network based, but will work with a video window from the main Cue Player One computer as an additional screen. This would be used for a followspot monitor in the booth. The other locations, A. B. C, and D are remote connections from web browsers on the remote users phone or tablet. The Setup button is used to enter the location descriptions. Users are asked to login when they connect and their name appears in the leftmost button. They can then be matched to their position A,B,C, or D via the dropdown. This is a required pre-show setup task. A quick message can be sent from the message box by clicking the button. Use within the cue file is explained in the Control topic.
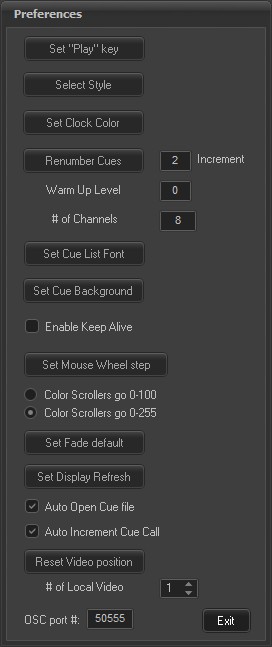 This window controls the operational settings for the program. First, which key should be used to trigger a cue; the Space bar or the Enter key. Adding Page Down gives the option for common hand-held "clicker" tools. Second, you may select the style, or appearance of the program. The Help file pictures were taken with Charcoal Dark Slate selected. Setting the Clock color will affect the running clock in the upper right corner of the main screen. After a cue list is written, it can be renumbered by the increment indicated. A Warm Up Level other then 0 can be specified and would be the minimum level for incandescent lamps.
The number of light channels used or displayed can be set up to a limit of 512. This is the normal maximum of a lot of USB and Art-Net interfaces. It is recommended to set it to the actual number of channels you have at your venue.
The font and font size of the cue list can be set to what pleases you. The background color of the cue list can be lighter or darker.
Keep Alive simply activates the disk drive every minute so that it stays spinning. Still, it is recommended that power control be turned off. That is, set the computer to be constantly on. It would also be a good idea to turn off any virus checking program.You do not want a virus scan starting half way through Act 1. This is not necessary when using a SSD on the computer.
The change amount for levels at each movement of the mouse wheel can be set to 1, 2, 5, or 10. Your color scroller levels can go from 0-100 or 0-255. If 100 is maximum, then they are internally multiplied by 2.55. Setting a Fade default will prefill the fade time value of added light cues.
Set Display Refresh determines how frequently, or if, the level settings of the channels scroll to their new levels as a cue is being played.
If Auto Open is checked, then the last used cue file will be loaded when the program starts. Auto Increment will prefill the Cue Call field with the next highest number. When video players are set to open on additional monitors or projectors, Reset Video position will move them back to the main monitor as a convenience. Up to 5 video players can be controlled in cues. Some may be local video ports on the main computer, some may be running on remote networked computers. Setting the number of local instances will open that many players at program start.
Finally, the port number used to listen for OSC commands from other devices can be set. See the Connections help topic for details.